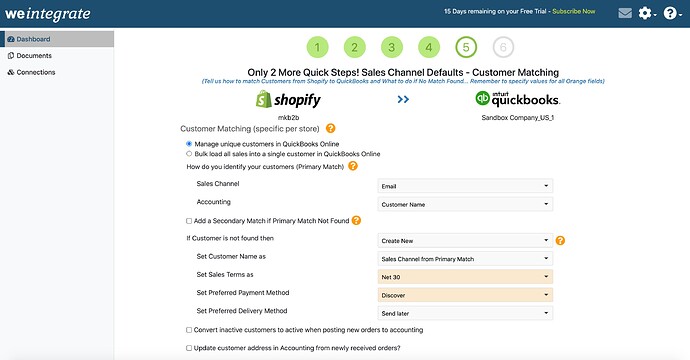
Step 5 of your Configuration Setup Wizard is where you establish the Customer Matching Settings for your initial Shopify store that instruct the weintegrate app how you wish to manage the process of linking the customer information you receive from your Shopify store with the corresponding customer information with QuickBooks Online (QBO).
The values you specify in your Customer Matching Settings are store specific, and will be used only for the Shopify Sales Channel you are updating. While weintegrate presets all of the white background dropdown lists with default values, you are welcome to change these values as you see fit. All dropdown lists with an orange background are however not preset, as the values of these dropdown lists are populated with data from your QuickBooks Online account, and are custom to you. You will need to set these default values yourself, based on what best suits your business needs. Please note that all dropdown lists require a value to be set in order to proceed to the next step.
Click any of the following links for specific instructions of how to manage each of the Customer Matching settings:
- Select Bulk or Unique Customer Matching in QuickBooks Online
- Set Unique Customer Matching with Primary Match between Shopify and QuickBooks Online
- Add Secondary Match to Customer Matching between Shopify and QuickBooks Online
- If Shopify Customer Not Found in QuickBooks Online, Auto-Create a New Customer in QBO
- If Shopify Customer Not Found in QuickBooks Online, Load Sales into Bulk Customer in QBO
- While Integrating Shopify to QuickBooks Online, Convert Inactive Customers to Active
- While Integrating Shopify to QuickBooks Online, Update Customer Address
To complete the initial setup and start importing Shopify documents into QuickBooks Online, make sure to complete the remaining 1 step of the Wizard.
Click here to learn about Step 6 of the Wizard - Setting Item Matching for Shopify Integration with QuickBooks Online .
