Overview
With Match each customer, every Shopify order is recorded in QuickBooks Online against its own customer. weintegrate finds that customer by comparing one field from the Shopify order with one field on your QuickBooks Online customers. This is the primary match. If the customer isn’t in QuickBooks yet, weintegrate can create it for you or use a default customer you choose, depending on your If Customer is not found then setting.
Using one catch-all customer (Bulk, use one default catch-all customer)? Skip this guide — see Select bulk or unique customer matching in QuickBooks Online.
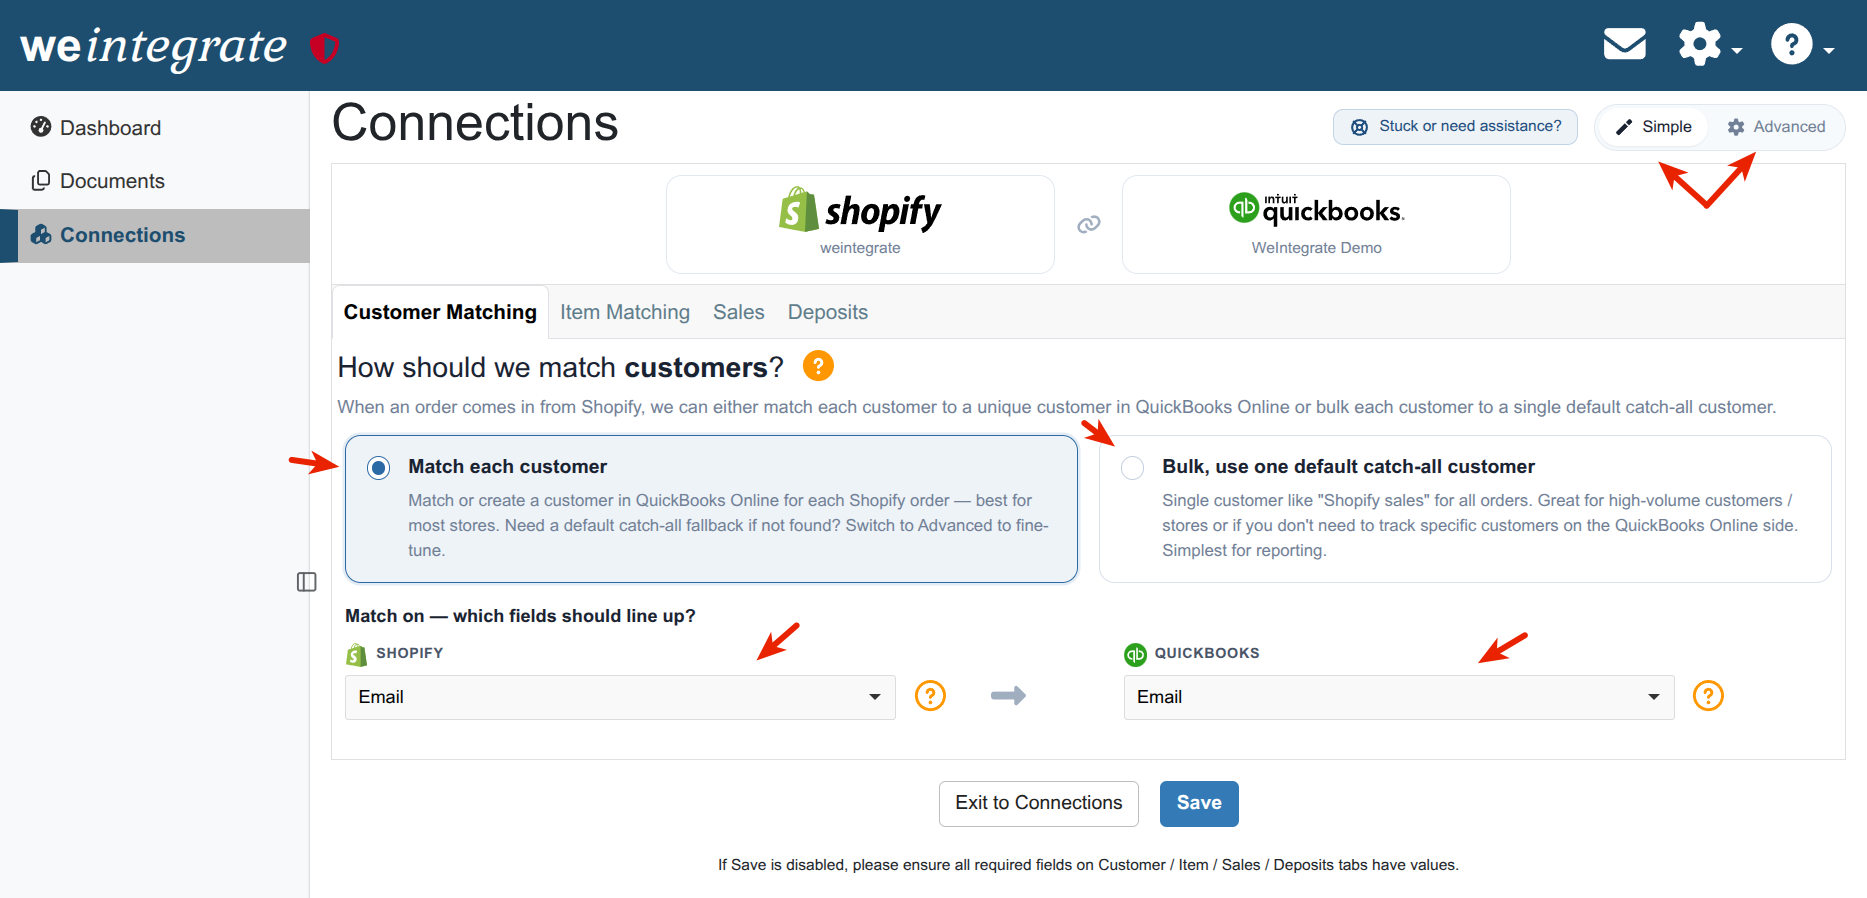
Quick setup
- Open the customer matching settings:
- While setting up your store — the customers step of the setup wizard (How should we match customers?).
- Any time afterwards — go to Connections, select Edit Settings under your Shopify store, and open the Customer Matching tab.
- Select Match each customer.
- Under Match on — which fields should line up?, pick a SHOPIFY field and a QUICKBOOKS field. For most stores, Email and Email is a good start (see the tip below).
- Switch to Advanced at the top of the page. Under If Customer is not found then, choose Create New or Use Default Customer.
- Select Continue (setup wizard) or Save (Edit Settings).
Done. Changes apply to orders synced after you save; orders already in QuickBooks are not changed.
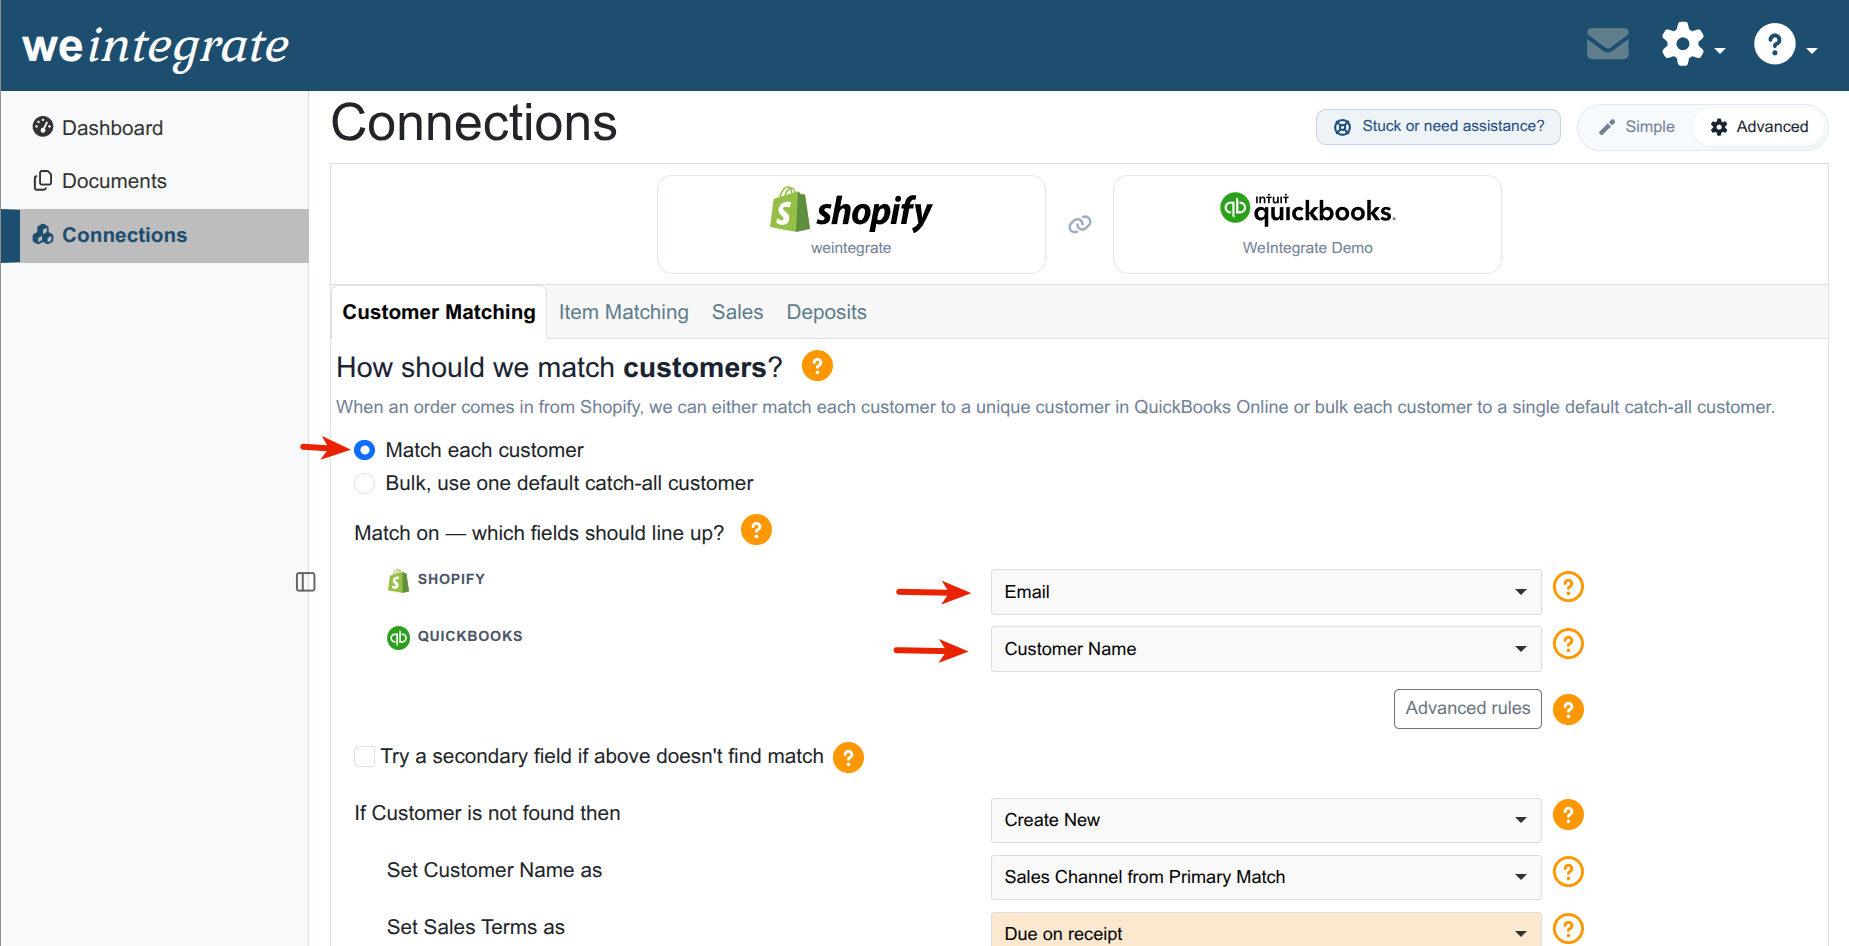
Simple shows the primary Match on fields. Advanced adds If Customer is not found then, the secondary field and the Advanced rules button.
Match on — your options
We look for a QuickBooks customer with the same value as the Shopify customer. Example: with Email ↔ Email, an order from jane@example.com goes to the QuickBooks customer whose email is jane@example.com.
Pick the fields that match how your customers are already set up in QuickBooks. Matching only works when the same value is stored on both sides, so it depends on the customer records already in your QuickBooks Online company:
- If your QuickBooks customers have their email address filled in, use Email ↔ Email.
- If you (or a previous app or bookkeeper) entered customers with their email address, or another Shopify value, as the Customer Name, use that Shopify field ↔ Customer Name instead.
- Not sure? Open a few customers in QuickBooks Online and look at which field holds the value you’d see in Shopify.
- Need something a single pair of fields can’t do — for example, sending every shopper with an
@acme.comemail to one Acme Inc customer, or trying several fields in a set order? Use Advanced rules (Professional plan or higher, and included with your Free Trial), explained in Advanced rules further down this guide.Customers that weintegrate creates for you (with Create New) get the shopper’s email address whenever Shopify has one, so Email ↔ Email keeps finding them on later orders.
SHOPIFY — the value we take from the order’s customer:
| Option | What we use |
|---|---|
| the customer’s email address | |
| Company Name | the company on the customer’s default address (if there’s no company, their first and last name) |
| FirstName LastName | e.g. Jane Doe |
| LastName, First Name | e.g. Doe, Jane |
| FirstName LastName, CompanyName | e.g. Jane Doe, Acme Inc |
| FirstName LastName, ZipCode | e.g. Jane Doe, 90210 |
| LastName, FirstName, ZipCode | e.g. Doe, Jane, 90210 |
| Phone | the phone number on the customer’s default address |
QUICKBOOKS — the QuickBooks customer field we compare it with:
| Option | Notes |
|---|---|
| Customer Name | The name shown for the customer in QuickBooks (its display name). |
| the customer’s email | |
| Phone | the customer’s phone |
| Company Name | The Company field on the QuickBooks customer. It can be empty. (see below) |
| FirstName LastName | the customer’s first and last name; both must be filled in (see below) |
| LastName, FirstName | the customer’s last and first name; both must be filled in (see below) |
Hover over Customer Name or Company Name in the dropdown to see the same hint.
No customer found? We try the secondary match (if turned on), then your If Customer is not found then setting.
Company Name, FirstName LastName and LastName, FirstName
QuickBooks doesn’t require these values to be unique, so picking one in Advanced shows a warning:
- Company Name — if several customers share a company name, the first in QuickBooks name order is used, which may not be the one you expect.
- FirstName LastName / LastName, FirstName — customers who share a name, such as two John Smiths, are matched to the same QuickBooks customer.
If Customer is not found then
Shown in Advanced. It applies when neither the primary match nor (if turned on) the secondary match finds a customer.
| Option | What happens |
|---|---|
| Create New | we create the customer in QuickBooks Online for you, using the order’s details |
| Use Default Customer | the order is recorded against the customer you pick in Select Default from QBO |
With Create New you also choose:
- Set Customer Name as — which Shopify value becomes the new customer’s name: Sales Channel from Primary Match (your primary SHOPIFY field), or Sales Channel from Secondary Match when the secondary field is turned on.
- Set Sales Terms as, Set Preferred Payment Method and Set Preferred Delivery Method (Send later, Print later or None) — defaults for customers we create.
- If Create New failed, Select Default from QBO — the customer to use if QuickBooks won’t let us create one.
More detail: If Shopify customer not found in QuickBooks Online, auto-create a new customer in QBO.
Good to know
Each weintegrate Shopify connection has its own customer matching settings and rules.
Orders with no customer skip matching. A sales receipt is created without a customer. An invoice (QuickBooks requires a customer) uses the customer picked in Select Default from QBO (Use Default Customer) or If Create New failed, Select Default from QBO (Create New).
Troubleshooting
I can’t change the SHOPIFY / QUICKBOOKS dropdowns.
They’re locked while the primary match has Advanced rules. Open Advanced rules, delete the Primary rules, then change them.
Advanced rules
You only need these if the standard Match on fields — one value compared exactly with one value — can’t line up your records. For example:
- everyone ordering with an
@acme.comemail should go to your one Acme Inc customer; - your QuickBooks customers are named differently from Shopify, such as
Acme Inc - Wholesale; - staff orders should go to a single “Staff Purchases” customer.
A rule says “when the Shopify value looks like this, find the QuickBooks customer whose field looks like that”.
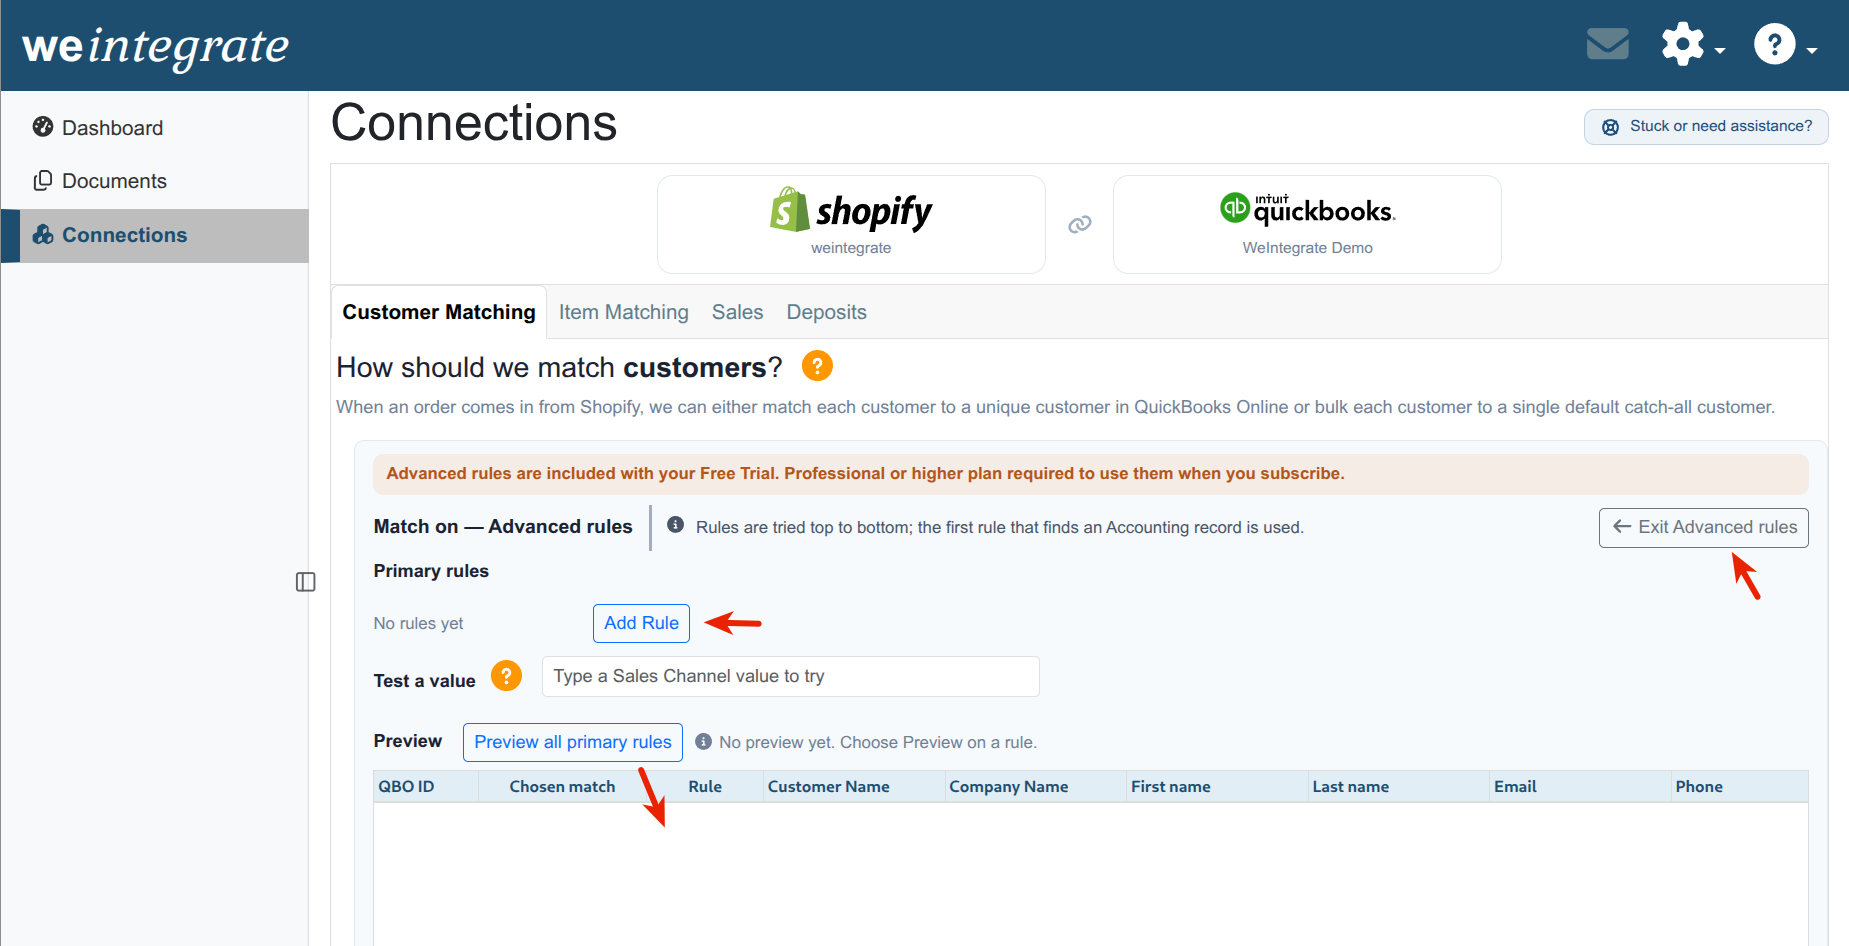
Who can use them
- During your weintegrate Free Trial, the editor shows: “Advanced rules are included with your Free Trial. Professional or higher plan required to use them when you subscribe.”
- After you subscribe, they need the Professional plan or higher. On other plans the Advanced rules button is greyed out and hovering shows “Available only with Professional and higher subscription plans”.
If your rules can’t be used (for example after a plan change), we keep them as Saved advanced rules (read-only) and use your Match on fields instead.
How rules are used for each order
- Primary rules, top to bottom. The first rule that finds a QuickBooks customer wins.
- If none does: your primary Match on fields.
- If still not found, and the secondary field is ticked: the Secondary rules, then your secondary Match on fields.
- If still not found: your If Customer is not found then setting.
While a list has rules (and rules are available to you), its Match on dropdowns are locked. Remove that list’s rules to change them.
The Advanced rules button under the secondary QUICKBOOKS dropdown (shown when the secondary field is ticked, or secondary rules exist) opens the Secondary rules in the same editor — see Add secondary match to customer matching. This guide covers the Primary rules.
Set up a rule
- Switch to Advanced and select Match each customer.
- Select Advanced rules under the primary QUICKBOOKS dropdown. It reads Advanced rules (2) when the list already has 2 rules. The Match on — Advanced rules editor replaces the standard fields.
- Select Add Rule. A new rule starts as Email — no condition, matched to Customer Name equals
{source}. Change it to what you need. - Use Test a value and Preview to check it (see below).
- Select Exit Advanced rules, then Continue (setup wizard) or Save (Edit Settings).
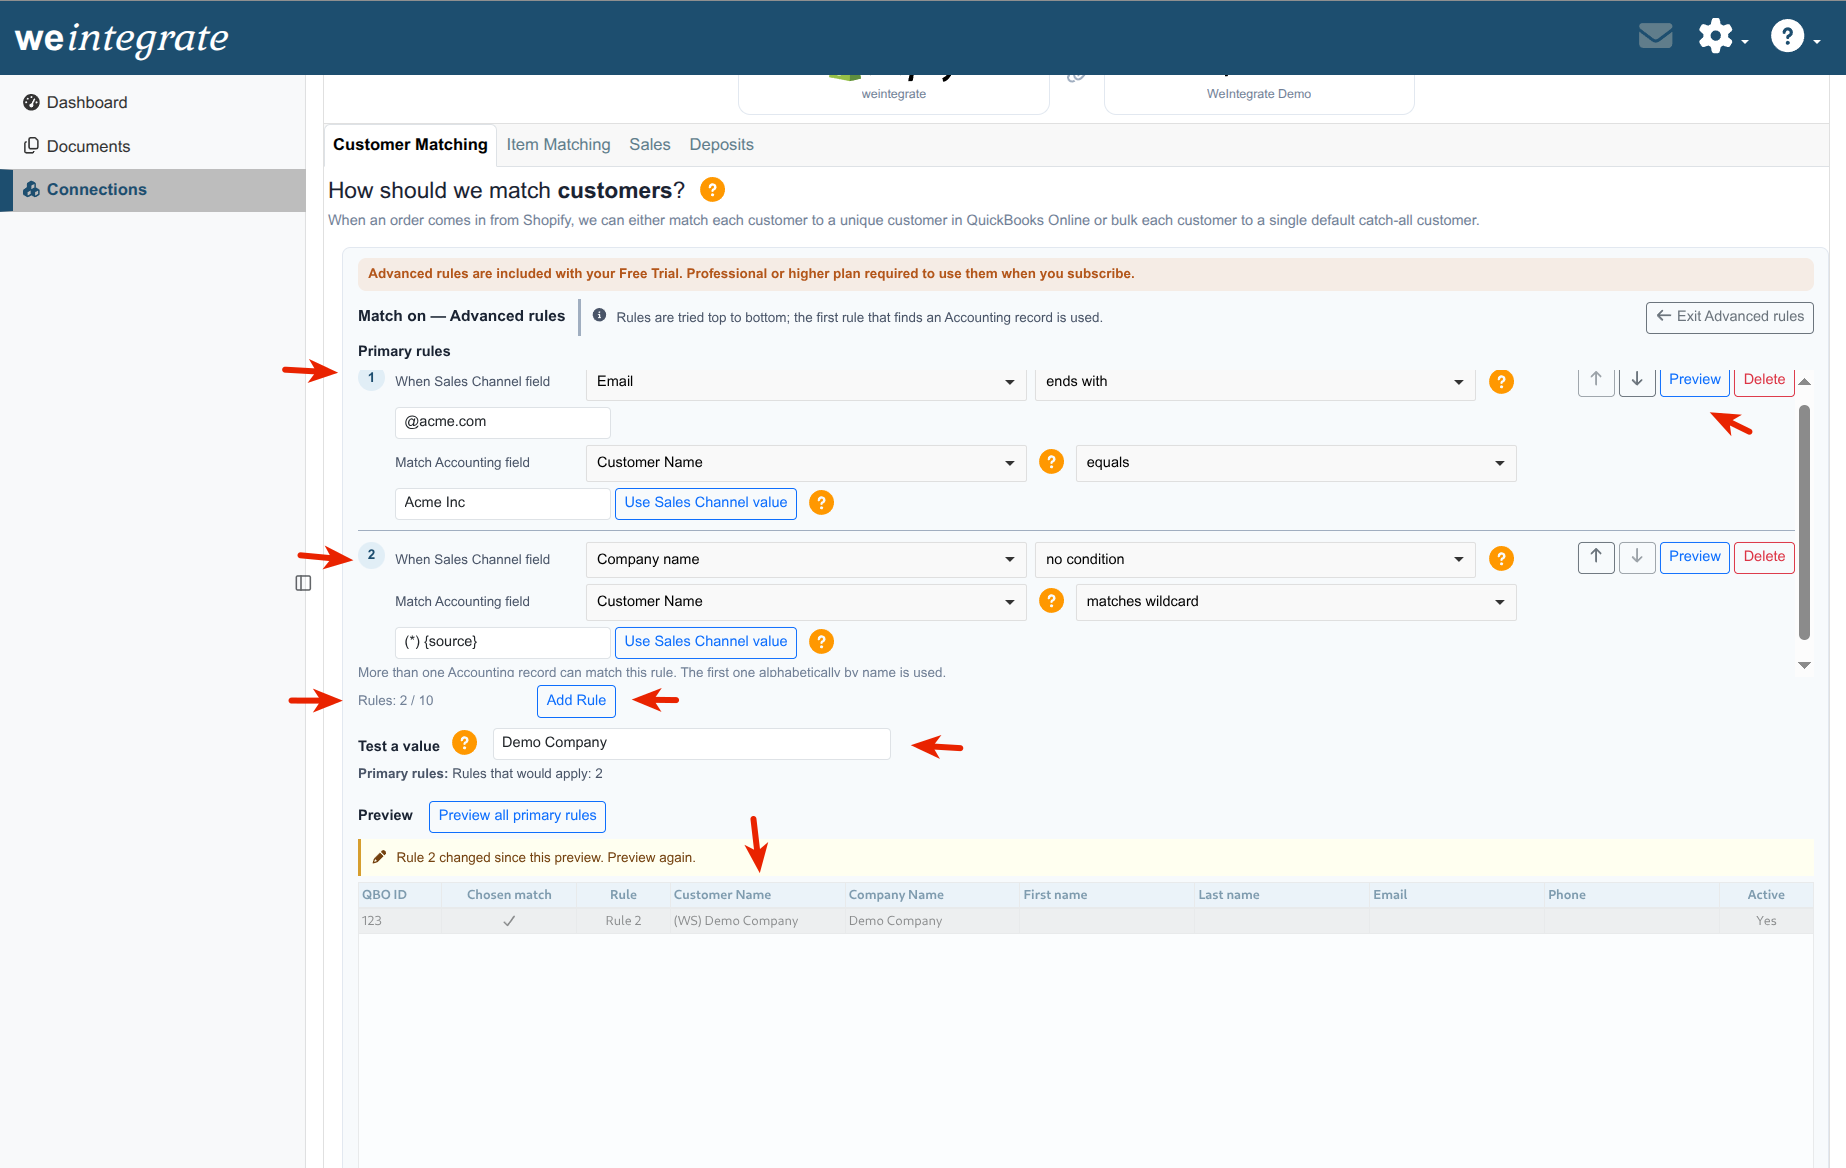
Each rule reads as two lines:
When Sales Channel field [field] [condition] [text]
Match Accounting field [field] [comparison] [text]
{source} stands for the order’s value of the Sales Channel field you picked. For example, {source} - Wholesale becomes Acme Inc - Wholesale for an order from Acme Inc.
Rule fields and options in detail
The editor reminds you: “Rules are tried top to bottom; the first rule that finds an Accounting record is used.”
When Sales Channel field
- Field — Email, Company name, First name, Last name, FirstName LastName, LastName, FirstName or Phone.
- Condition — optional. no condition tries the rule for every order. Or choose equals, starts with, contains, ends with or matches wildcard and type the text to look for; the rule is then only tried when the Shopify value meets that condition.
Match Accounting field
- Field — Customer Name, Company Name, First name, Last name, FirstName LastName, LastName, FirstName, Email or Phone.
- Customer Name: The name shown for the customer in QuickBooks (its display name). Company Name: The Company field on the QuickBooks customer. It can be empty. Hover over either option to see this hint.
- FirstName LastName and LastName, FirstName only find QuickBooks customers that have both a first name and a last name.
- Comparison — equals, starts with, contains, ends with or matches wildcard.
- Text — what to look for in QuickBooks: fixed text, Use Sales Channel value, or both. For fixed text only (such as
Acme Inc), delete the{source}a new rule starts with.
Use Sales Channel value adds {source} to the end of the text box (if it isn’t already there).
Use the arrow buttons to move a rule and Delete to remove it.
Limits and rules of thumb
- Up to 10 rules in each list (the footer shows Rules: 2 / 10).
- Capital letters never matter, on either side.
- Text can be up to 100 characters.
- Two identical rules in a list aren’t allowed.
- With starts with, contains, ends with or matches wildcard, more than one QuickBooks customer may fit. The rule then shows: “More than one Accounting record can match this rule. The first one alphabetically by name is used.” Make the text more specific if that isn’t the customer you want.
Wildcard rules in detail
With matches wildcard, hover over the help icon next to the text box for a reminder.
*means any run of characters (or none);?means exactly one character.- The whole value must match. On the Accounting side, text ending with
*only needs to match the start. - On the Accounting side, use at most three
*wildcards. To look for a real*or?, put a backslash in front:50\*off*. - A Shopify value added with Use Sales Channel value is always taken literally — a
*or?in it is not a wildcard.
| Wildcard | Matches | Doesn’t match |
|---|---|---|
*@acme.com |
jane@acme.com |
jane@acme.co.uk |
acme* |
Acme Inc, Acme Wholesale |
The Acme Co |
*inc? |
Acme Inc. |
Acme Inc |
Check your rules: Test a value and Preview
- Test a value — type a value Shopify could send, such as an email address or name. We show which primary rules would be tried, e.g. Primary rules: Rules that would apply: 1, 3 or Primary rules: No rule applies to this value. It only checks the When Sales Channel field conditions.
- Preview — on each rule, plus Preview all primary rules below the list. It shows which QuickBooks customer a rule finds. A check mark in Chosen match marks the customer an order would get. Rule shows which rule found each customer; Preview all primary rules lists the customers found by the first rule that finds any.
Preview details
- The preview lists the QuickBooks customers found, in the columns QBO ID, Chosen match, Rule, Customer Name, Company Name, First name, Last name, Email, Phone and Active. Hover over Chosen match to see what it means. If several customers match, the first by name is the one used. Scroll sideways if the columns don’t all fit.
- A preview needs a Test a value entry when the rule uses Use Sales Channel value or has a Sales Channel condition. Without one, you’ll see “Type a value in Test a value above to run this preview.”
- The first preview can take up to a minute while we index your QuickBooks customers.
- If you change a rule or the test value after previewing, the result is marked as changed — select Preview again.
Saving and status
Continue and Save are hidden while the editor is open. Select Exit Advanced rules first.
After you save, a status appears next to the Advanced rules button:
- Rules activating… this can take a few minutes after saving — orders synced meanwhile use your standard Match on fields.
- Active — your rules are used for every order from then on.
Messages when a rule has a problem
- Exit Advanced rules shows “Fix the rules marked below before leaving Advanced rules.” and highlights the rule.
- Saving stays blocked while a rule has a problem, and “Fix the advanced rules before saving” shows next to the Advanced rules button.
Example rule sets
1. Send a company’s employees to one customer. Orders from @acme.com emails go to Acme Inc; everyone else is matched normally.
| # | When Sales Channel field | Match Accounting field |
|---|---|---|
| 1 | Email ends with @acme.com |
Customer Name equals Acme Inc |
| 2 | Email ends with @globex.com |
Customer Name equals Globex Corporation |
Test it: type jane@acme.com in Test a value (only rule 1 applies), then Preview rule 1 and confirm Acme Inc has the check mark in Chosen match.
2. Wholesale customers named differently in QuickBooks. Wholesale accounts enter their business name as the company at checkout (e.g. Acme Inc), but in QuickBooks you named them Acme Inc - Wholesale.
| # | When Sales Channel field | Match Accounting field |
|---|---|---|
| 1 | Company name — no condition | Customer Name equals {source} - Wholesale |
Select Add Rule, set the Sales Channel field to Company name, keep equals and {source} (missing? select Use Sales Channel value), and type - Wholesale after it. Companies with no wholesale customer fall through to your Match on fields. Use equals: starts with would also find Acme Inc - Retail, which wins as first alphabetically.
3. Staff purchases to one house account, checked before any other rule.
| # | When Sales Channel field | Match Accounting field |
|---|---|---|
| 1 | Email ends with @mystore.com |
Customer Name equals Staff Purchases |
| 2 | Email ends with @acme.com |
Customer Name equals Acme Inc |
Keep the most specific rules at the top: the first rule that finds a customer wins.
4. QuickBooks names with a bracketed prefix. In QuickBooks your customers are named with a code in brackets, such as [RTL] Jones Audio or [WHS] Jones Audio, while Shopify has just Jones Audio as the company.
| # | When Sales Channel field | Match Accounting field |
|---|---|---|
| 1 | Company name — no condition | Customer Name matches wildcard [*] {source} |
| 2 | Company name — no condition | Customer Name equals {source} |
Select Add Rule, set the Sales Channel field to Company name and the operator to matches wildcard, type [*] in the text box, then select Use Sales Channel value. * stands for any code, and the brackets must be in QuickBooks exactly as typed. The whole name must match, so [RTL] Jones Audio West is not found. If both [RTL] Jones Audio and [WHS] Jones Audio exist, the first alphabetically ([RTL]) is used. Rule 2 catches customers in QuickBooks without a prefix.
To check it, type the Shopify value — Jones Audio, without the prefix — in Test a value and select Preview: [RTL] Jones Audio has the check mark in Chosen match.
[BLD] Jane Doeand QuickBooks hasJane Doe, a rule can’t remove the prefix from the Shopify value. Two ways to handle it:
- Match on the person’s name (no rule needed): set Match on to FirstName LastName ↔ Customer Name, when the shopper’s first and last name in Shopify are
JaneandDoe.- One rule per customer: see example 5.
5. One QuickBooks customer for a Shopify company with any bracketed prefix. Shopify sends the company as [BLD] Jane Doe or [RTL] Jane Doe, and QuickBooks has one customer named Jane Doe.
| # | When Sales Channel field | Match Accounting field |
|---|---|---|
| 1 | Company name matches wildcard [*] Jane Doe |
Customer Name equals Jane Doe |
Clear {source} from the bottom text box and type Jane Doe, so every matching order looks for that one customer.
- The condition checks the Shopify company:
*stands for any code, the brackets are taken as typed, and capital letters don’t matter. - The whole company must fit the pattern, so
[BLD] Jane Doe Incis not included. - The rule can also target FirstName LastName: Company name matches wildcard
[*] Jane Doe→ FirstName LastName equalsJane Doe(fixed text, not{source}) finds the QuickBooks customer whose first name isJaneand last name isDoe, whatever its Customer Name. - Any other company skips this rule and moves on to your next rule or your Match on fields.
- It takes one rule per customer, up to 10 rules. For many customers named this way, matching on FirstName LastName or Email is easier.
To check it, type the Shopify value with its prefix — [BLD] Jane Doe — in Test a value and select Preview.
Acme IncorStaff Purchases) must already exist in QuickBooks Online — rules only find customers, never create them. A rule that finds no one passes to the next rule.
Troubleshooting Advanced rules
The Advanced rules button is greyed out.
Your plan doesn’t include them. See Who can use them above.
My rules don’t seem to be used.
Check the status next to the button. Until it says Active, orders use your standard Match on fields. If your rules are in the Secondary rules list, see Add secondary match to customer matching.
I see “These rules were written for a different Accounting company and are not applied.”
They were set up for a different connected QuickBooks Online company, so they’re kept but not used. Delete that list’s rules and select Save, then reopen Edit Settings, add the rules you need and Save.
The wrong customer was used.
Use Test a value with the customer’s value and Preview the rule. If several customers fit, the first alphabetically is used. Make the rule’s text more specific, or move a more specific rule higher.
I can’t leave the editor or save.
A rule has a problem. It’s marked in red with what to fix, such as missing text, more than three * wildcards, or an identical rule.