Overview
When mapping Shopify discounts as line items in QuickBooks Online, weintegrate allows you to optionally assign a QuickBooks Online class to these discount line items. This enables advanced reporting and tracking by department, location, product line, or any other classification system you use in your business.
This class assignment is supported for these QuickBooks Online transaction types:
- Sales Receipts and Refund Receipts (when using the Sales Receipt record sales type)
- Invoices and Credit Memos (when using the Invoice record sales type)
What is Class Tracking?
QuickBooks Online class tracking is a powerful feature that allows you to categorize transactions across different segments of your business. By assigning classes to discount line items, you can:
- Track discount performance by department, location, or division across all transaction types
- Generate class-based profit and loss reports to see discount impact by segment
- Analyze discount effectiveness across different business units
- Maintain separate financial reporting for multi-location or multi-division operations
- Compare discount strategies between different stores or channels
Prerequisites
Before assigning classes to discount line items, ensure:
- Class Tracking Enabled in QuickBooks Online: You must enable class tracking in your QBO company settings
- If not enabled, see: Turn on Class Tracking in QuickBooks Online
- Classes Created: At least one class or sub-class must exist in your QuickBooks Online company
- Discount Line Item Configured: The “Create Discount as Line Item” feature must be enabled in Sales & Deposits settings
- Discount Service Item Created: A Service-type item for discounts must exist in QuickBooks Online
How to Assign a Class to Discount Line Items
Step 1: Access Sales & Deposits Settings
- Navigate to your Shopify connection settings in weintegrate
- Click on the Sales & Deposits tab
- Scroll to the Sales section
Step 2: Enable Discount Line Item Mapping
- Ensure the “Create Discount as Line Item in QuickBooks Online” checkbox is checked
- Verify you’ve selected a discount Service item from the Discount Line Item dropdown
- The class assignment option will appear below these settings
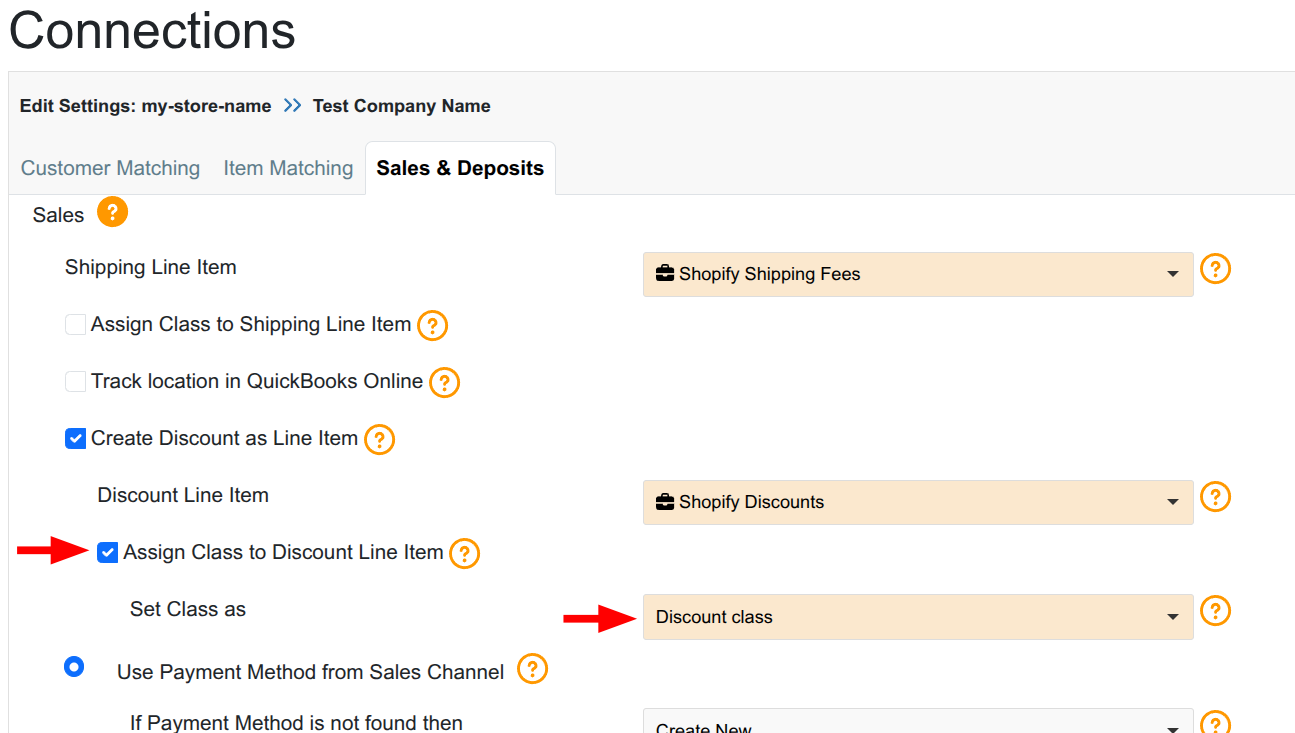
Step 3: Enable Class Assignment
- Locate the “Assign Class to Discount Line Item” checkbox
- Check this box to enable class assignment
- If the checkbox appears greyed out, class tracking is not enabled in QuickBooks Online
- You must enable class tracking in QBO before this option becomes available
Step 4: Select Your Class
- Once the checkbox is enabled, the Class dropdown field will appear
- Click the dropdown to view all available classes and sub-classes from your QuickBooks Online company
- Select the appropriate class for your discount line items
- You can search by typing the class name
- Sub-classes are displayed with indentation for easy identification
Step 5: Save Configuration
- Review your selections
- Click Save or Next (depending on whether you’re in the setup wizard or editing an existing connection)
- Your class assignment will be applied to all future discount line items on all transaction types
What Happens After Configuration
Once enabled (this setting is not retroactive), weintegrate on new orders created after saving this setting will:
- Create a separate line item for discounts on your configured QuickBooks Online transaction type
- Automatically assign your selected QuickBooks Online class to each discount line item
- Enable class-based reporting for discount tracking and analysis across all transaction types
- Maintain consistency across all transactions from this Shopify store connection
Troubleshooting
The “Assign Class to Discount Line Item” checkbox is greyed out
- Cause: Class tracking is not enabled in QuickBooks Online
- Solution: Enable class tracking in QuickBooks Online company settings
- Disconnect your QuickBooks Online connection from weintegrate and Re-Connect your QuickBooks Online Connection with weintegrate to force the updated settings to be recognized
- Return to weintegrate Shopify store connection settings to configure class assignment
No classes appear in the Class dropdown
- Cause: No classes have been created in QuickBooks Online
- Solution: Create at least one class in QBO
- Go to Settings → All Lists → Classes
- Click “New” to create a class
- Return to weintegrate and refresh the connection settings
The class isn’t appearing on transactions in QuickBooks Online
- Verify the checkbox is enabled in weintegrate settings
- Ensure you’ve selected a valid class from the dropdown
- Check that you’ve saved the configuration
- Wait for the next new order to sync
Related Topics
- Map Shopify Discounts to Discount Line Items in QuickBooks Online
- Create a Product in QBO for Mapping Discounts from Shopify
- Set a QuickBooks Online Class to Shipping Fees by Store Connection
- Sales Default: Integrate Shopify with QuickBooks Online Record Sales Type
- Sales & Deposits Configuration Guide