Overview
When syncing Shopify orders to QuickBooks Online, weintegrate requires you to map a Shipping Line Item — even if you don’t currently ship to customers. This ensures the integration is ready to handle shipping fees whenever your business needs change (for example, shipping direct-to-customer from a POS location).
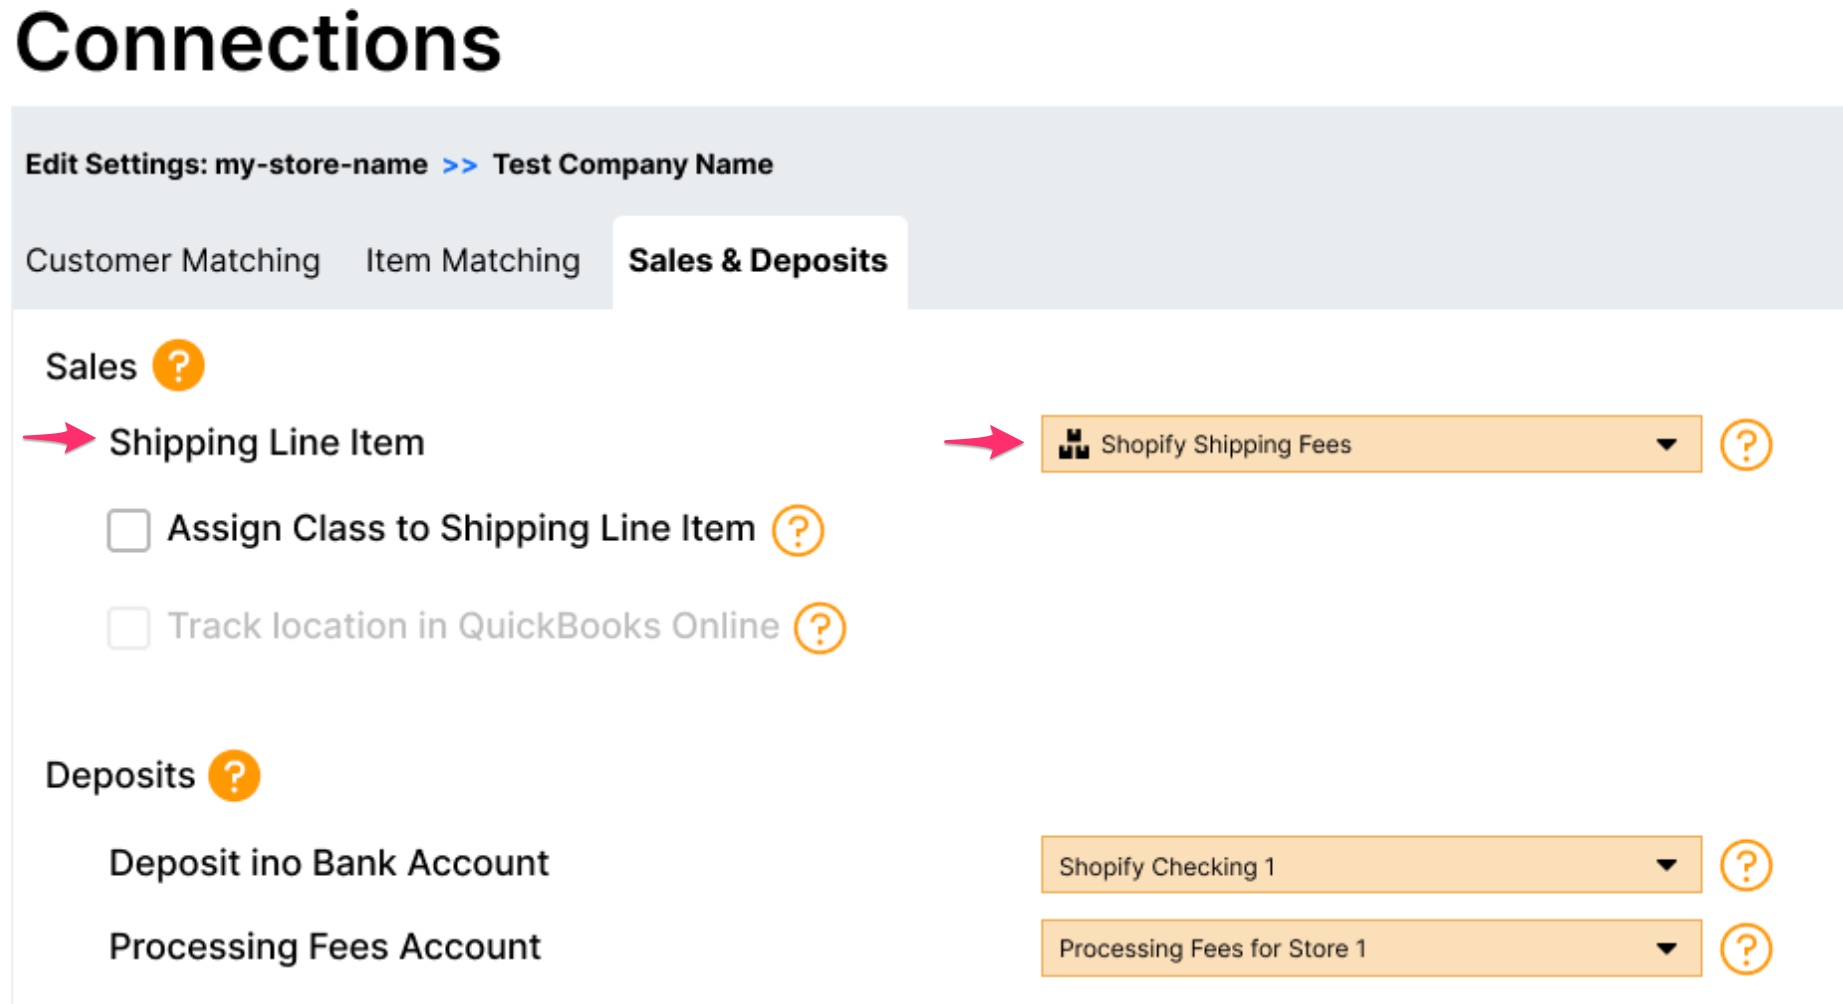
Within the Sales & Deposits tab of each store’s connection settings, set the Shipping Line Item field to one of the available dropdown values (which are Service-type items imported from your QuickBooks Online company) for this field.
This setting is supported for these QuickBooks Online transaction types:
-
Sales Receipts and Refund Receipts (when using the Sales Receipt record sales type)
-
Invoices and Credit Memos (when using the Invoice record sales type)
Why Map Shipping Fees as Line Items?
weintegrate maps shipping fees as dedicated line items on QuickBooks Online transactions rather than recording them in the default shipping field at the bottom of a receipt. This approach provides:
-
Sales tax override support: Using QuickBooks Online’s built-in Shipping field does not allow selectively controlling or overriding the Sales Tax that comes from the Shopify order which can lead to differing amounts (as per QuickBooks’ guidance). Some states allow / require shipping to be taxable
-
Class tracking: Optionally assign QuickBooks Online classes to shipping fee line items for departmental or location-based reporting
-
Enhanced visibility: Track shipping fee income at the line-item level on each transaction
-
Improved reporting: Generate detailed reports on shipping revenue across all stores and transaction types
-
Per-store tracking: Create separate Service items per Shopify store connection to track shipping income individually in QuickBooks Online
-
Better reconciliation: Ensure the most accurate data between Shopify and QuickBooks Online, making month-end closing easier and faster
Prerequisites
Before configuring shipping line item mapping, ensure you have:
-
Service Item Created: A dedicated Service-type item in QuickBooks Online for tracking shipping fees
-
Class Tracking Enabled (Optional): If you plan to assign classes to shipping fee line items, class tracking must be enabled in QuickBooks Online
- Learn more: Enable Class Tracking in QuickBooks Online
Note: The Shipping Line Item product should be created in QuickBooks Online before connecting your QuickBooks company to weintegrate. If you have already connected without creating the item, you can disconnect your QBO company, create the product, and reconnect. See Manage Your QuickBooks Online Connection for details.
How to Configure Shipping Fee Line Item Mapping
Step 1: Access Sales & Deposits Settings
-
Navigate to your Shopify connection settings in weintegrate
-
Locate the Sales & Deposits tab
-
Scroll to the Sales section
Step 2: Select Your Shipping Fee Service Item
-
Click the Shipping Line Item dropdown menu
-
Select the Service-type item you created in QuickBooks Online for tracking shipping fees
-
You can search by typing the product name in the search field
Tip: Only Service-type items from QuickBooks Online appear in the dropdown. If your item doesn’t appear, verify it was created as a Service (not Inventory or Non-inventory) in QuickBooks Online.
Step 3: Assign a Class to the Shipping Line Item (Optional)
If you want to track shipping fee income by department, location, or other classifications:
-
Check the “Assign Class to Shipping Line Item” checkbox
-
This option only appears if class tracking is enabled in QuickBooks Online
-
If the checkbox appears greyed out, you need to enable class tracking first
-
-
Select your desired class or sub-class from the Class dropdown menu
-
All shipping fee line items will be assigned to this class on all transaction types
For detailed instructions on class assignment, see: Set a QuickBooks Online Class to Shipping Fees by Store Connection
Step 4: Save Configuration
-
Review your selections
-
Click Save or Next (depending on whether you’re in the setup wizard or editing an existing connection)
-
Your shipping fee line item mapping will be applied to all future transactions
What Happens After Configuration
Once configured, weintegrate will on new orders created after saving this setting:
-
Create a separate line item for shipping fees on your configured QuickBooks Online transaction type
-
Apply the shipping fee amount from each Shopify order to the line item
-
Map the line item to your selected QuickBooks Online Service item
-
Automatically handle the tax status of the shipping line item — if no shipping tax was charged in Shopify, the tax box will be unchecked
-
Apply the selected class (if configured) to enable class-based reporting
-
Maintain accurate synchronization between Shopify and QuickBooks Online
Troubleshooting
My Service item doesn’t appear in the “Shipping Line Item” dropdown
-
Verify the item was created as a Service type in QuickBooks Online (Inventory and Non-inventory items are not supported). See: Create a Product in QBO for Mapping Shipping Fees from Shopify
-
If you created the item after connecting to weintegrate, disconnect and reconnect your QBO company to refresh the item list. See Manage Your QuickBooks Online Connection
The “Assign Class to Shipping Line Item” checkbox is greyed out
- Class tracking must be enabled in QuickBooks Online. See Turn On Class Tracking in QuickBooks Online
Shipping fees aren’t appearing on transactions
-
Verify a valid Service item is selected in the Shipping Line Item dropdown
-
Ensure the Shopify order includes shipping charges
-
Review a recently synced order in QuickBooks Online to confirm the shipping fee line item appears
Shipping tax amounts don’t match between Shopify and QuickBooks
-
If you are using the sales tax override feature, confirm it is properly enabled in weintegrate Preferences. See Override Sales Tax in QuickBooks Online with Shopify Sales Tax
-
Verify the Service item is marked as taxable in QuickBooks Online — weintegrate manages the tax checkbox per transaction automatically
-
Contact support if discrepancies persist
Related Topics
-
Create a Product in QBO for Mapping Shipping Fees from Shopify
-
Set a QuickBooks Online Class to Shipping Fees by Store Connection
-
Override Sales Tax in QuickBooks Online with Shopify Sales Tax
-
Map Shopify Discount to Discount Line Items in QuickBooks Online
-
Sales Default: Integrate Shopify with QuickBooks Online Record Sales Type